
Containerization has revolutionized how we deploy and scale applications. In this blog post, I’ll walk you through the complete process of containerizing a Flask application using Docker, focusing on the AQI (Air Quality Index) app as a practical example. We’ll cover everything from basic Docker concepts to advanced multi-container deployments with various services.
Understanding Docker Fundamentals
Before diving into the practical steps, let’s clarify some key Docker concepts:
What is a Container?
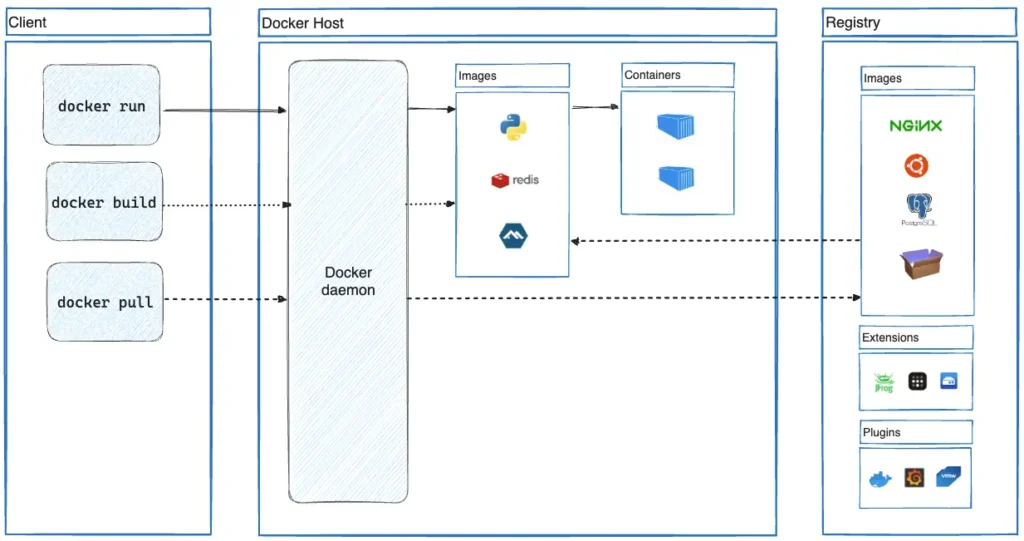
A container is a lightweight, standalone, executable software package that includes everything needed to run an application: code, runtime, system tools, libraries, and settings. Containers isolate software from its environment, ensuring it works uniformly across different computing environments.
What is a Docker Image?
A Docker image is a read-only template that contains a set of instructions for creating a container. It’s essentially a snapshot of a container that includes the application code, libraries, dependencies, tools, and other files needed for the application to run.
The Relationship Between Images and Containers
Think of a Docker image as a class in object-oriented programming, and a container as an instance of that class. From a single image, you can create multiple running containers, each isolated from the others.
Setting Up Docker
Let’s start by getting Docker installed and ready on your system.
Installing Docker
For Ubuntu/Debian-based systems:
sudo apt update
sudo apt install docker.io docker-compose
sudo systemctl enable --now docker

sudo usermod -aG docker $USER
For macOS and Windows, download and install Docker Desktop from the official Docker website.
Verifying Installation
After installation, verify Docker is working correctly:
docker --version

docker-compose --version

docker run hello-world
Containerizing the Flask AQI Application
Now, let’s explore how to containerize our Flask AQI application step by step.
Creating a Dockerfile
The Dockerfile is a script containing instructions to build a Docker image. Create a file named Dockerfile in your project’s root directory:
dockerfileCopy# Use an official Python runtime as a parent image
FROM python:3.9-slim

# Set the working directory in the container
WORKDIR /app

# Copy the current directory contents into the container at /app
COPY . /app/

# Install any needed packages specified in requirements.txt
RUN pip install --no-cache-dir -r requirements.txt

# Make port 5000 available to the world outside this container
EXPOSE 5000

# Define environment variable
ENV FLASK_APP=app.py
ENV FLASK_RUN_HOST=0.0.0.0

# Run app.py when the container launches

CMD ["flask", "run"]
Creating a .dockerignore File
To prevent unnecessary files from being included in your Docker image, create a .dockerignore file:
__pycache__/
*.pyc
*.pyo
*.pyd
.Python
env/
venv/
.venv/
ENV/
env.bak/
venv.bak/
.git
.gitignore
.env
.dockerignore
Dockerfile
*.md
Building the Docker Image
Build the Docker image with the following command:
docker build -t aqi-flask-app .This command creates an image named “aqi-flask-app” from the current directory (.).
Running the Container
Start a container from the image with:
docker run -d -p 5000:5000 --name aqi-container aqi-flask-appThis command:
-d: Runs the container in detached mode (in the background)-p 5000:5000: Maps port 5000 of the container to port 5000 on the host--name aqi-container: Names the container “aqi-container”aqi-flask-app: Specifies the image to use
Basic Docker Management Commands
Here are some useful commands to manage your Docker containers and images:
# List running containers
docker ps

# List all containers (including stopped ones)
docker ps -a

# Stop a container
docker stop aqi-container

# Start a stopped container
docker start aqi-container

# Remove a container
docker rm aqi-container

# List all images
docker images

# Remove an image
docker rmi aqi-flask-app

# View container logs
docker logs aqi-container

# Execute a command in a running container

docker exec -it aqi-container bash
Using Docker Compose for Multi-Container Applications
For applications requiring multiple services (like a web server, database, cache, etc.), Docker Compose simplifies management.
Creating a docker-compose.yml File
Create a docker-compose.yml file in your project root:
docker-compose.ymlCode
Launching the Application with Docker Compose
Start all services with a single command:
docker-compose up -dTo stop and remove all containers:
docker-compose downUnderstanding the Services
Let’s explore each service used in our Docker Compose setup:
Web Service
This is our Flask application container. It builds from the Dockerfile in the current directory and exposes port 5000. Environment variables configure the Flask app and connection strings for the other services. The volume mapping allows for code changes without rebuilding the image during development.
Redis Service
Redis is an in-memory data structure store, often used as a database, cache, or message broker. In our AQI application, Redis could be used for:
- Caching API responses to reduce external API calls
- Storing session data
- Rate limiting API requests
- Implementing a publish-subscribe pattern for real-time updates
The Redis service uses the official Redis Alpine image, which is lightweight and secure. Data persistence is configured through a volume.
MongoDB Service
MongoDB is a NoSQL document database that stores data in flexible, JSON-like documents. It’s ideal for applications with evolving data requirements. In our AQI app, MongoDB might store:
- Historical AQI readings
- User preferences and settings
- Location data
The volume ensures data persists beyond container lifecycles.
MySQL Service
MySQL is a traditional relational database management system. In our application, MySQL could handle:
- User authentication and authorization
- Structured data with relationships
- Transactional data that requires ACID compliance
Environment variables configure the database, user, and password.
Advanced Docker Techniques
Let’s explore some advanced Docker techniques for optimizing our containerized application.
Multi-Stage Builds
Multi-stage builds can significantly reduce image size by separating build-time dependencies from runtime dependencies:
# Build stage
FROM python:3.9 AS builder

WORKDIR /build
COPY requirements.txt .
RUN pip wheel --no-cache-dir --no-deps --wheel-dir /build/wheels -r requirements.txt

# Runtime stage
FROM python:3.9-slim

WORKDIR /app
COPY --from=builder /build/wheels /wheels
COPY --from=builder /build/requirements.txt .
RUN pip install --no-cache /wheels/*

COPY . .
EXPOSE 5000
ENV FLASK_APP=app.py
ENV FLASK_RUN_HOST=0.0.0.0

CMD ["flask", "run"]
Health Checks
Adding health checks ensures Docker only sends traffic to healthy containers:
HEALTHCHECK --interval=30s --timeout=3s \

CMD curl -f http://localhost:5000/health || exit 1
Add this to your Dockerfile or in docker-compose.yml:
services:
  web:
    # ... other configuration
    healthcheck:
      test: ["CMD", "curl", "-f", "http://localhost:5000/health"]
      interval: 30s
      timeout: 3s
      retries: 3

start_period: 40s
Container Networking
Docker Compose automatically creates a network for your application. Services can communicate using their service names as hostnames. For example, in your Flask app, you can connect to Redis using:
import redis

r = redis.Redis(host='redis', port=6379)
Deploying the Containerized Application
Let’s look at different deployment options for our containerized application.
Deploying to Docker Hub
First, tag your image with your Docker Hub username:
docker tag aqi-flask-app tejask0512/aqi-app:latestLogin to Docker Hub and push your image:
docker login

docker push tejask0512/aqi-app:latest
Using the Shared Docker Image
You can directly use the pre-built image mentioned in your question:
docker pull tejask0512/aqi-app

docker run -d -p 5000:5000 tejask0512/aqi-app
Or in docker-compose.yml, replace the build directive with:
web:
  image: tejask0512/aqi-app:latest
  # rest of configuration
Deploying to Production Environments
For production, consider the following modifications:
- Set environment variables appropriately:
environment:
  - FLASK_ENV=production

- FLASK_DEBUG=0- Use Docker secrets or environment files for sensitive data:
docker-compose --env-file production.env up -d- Set resource limits:
services:
  web:
    # ... other configuration
    deploy:
      resources:
        limits:
          cpus: '0.50'

memory: 512M
Docker Volumes for Data Persistence
Our docker-compose.yml already includes volumes, but let’s explain them in more detail:
Types of Docker Volumes
- Named Volumes: What we’re using in our compose file. Docker manages these volumes automatically.
- Bind Mounts: Map a host directory to a container directory:
volumes:
- ./host/path:/container/path- tmpfs Mounts: Store data in the host’s memory:
volumes:
  - type: tmpfs
    target: /app/cache
Managing Volumes
View all volumes:
docker volume lsCreate a volume:
docker volume create aqi_dataInspect a volume:
docker volume inspect redis_dataRemove unused volumes:
docker volume pruneMonitoring and Logging
For production applications, proper monitoring and logging are essential.
Viewing Container Logs
# View logs for a specific container
docker logs aqi-container

# Follow logs (stream in real-time)
docker logs -f aqi-container

# Show logs generated in the last hour

docker logs --since=1h aqi-container
Using Docker Stats
Monitor container resource usage:
docker statsIntegrating with External Monitoring Tools
For more comprehensive monitoring, you might integrate with:
- Prometheus and Grafana:
services:
  prometheus:
    image: prom/prometheus
    volumes:
      - ./prometheus.yml:/etc/prometheus/prometheus.yml
    ports:
      - "9090:9090"

  grafana:
    image: grafana/grafana
    ports:
      - "3000:3000"
    depends_on:

- prometheus- ELK Stack (Elasticsearch, Logstash, Kibana) for log aggregation and analysis.
Security Best Practices
Here are some security practices to follow when working with Docker:
- Run containers as non-root users:
# Create non-root user
RUN addgroup --system app && adduser --system --group app

USER app- Scan images for vulnerabilities:
docker scan aqi-flask-app- Use specific image tags instead of “latest” to ensure reproducibility.
- Limit container capabilities: .yaml
services:
  web:
    cap_drop:
      - ALL
    cap_add:

- NET_BIND_SERVICE- Use secrets management for sensitive information like API keys and passwords.
Optimizing Docker Images
To reduce image size and improve security:
- Use minimal base images like alpine or slim variants.
- Clean up in the same layer where you install: dockerfile
RUN apt-get update && \
apt-get install -y some-package && \
apt-get clean && \

rm -rf /var/lib/apt/lists/*- Minimize the number of layers by combining commands.
- Remove development dependencies in production builds.
Continuous Integration/Continuous Deployment (CI/CD)
Integrate Docker with CI/CD pipelines for automated testing and deployment:
Sample GitHub Actions Workflow: .yaml
name: Docker CI/CD

on:
  push:
    branches: [ main ]

jobs:
  build-and-deploy:
    runs-on: ubuntu-latest
    steps:
      - uses: actions/checkout@v2

      - name: Set up Docker Buildx
        uses: docker/setup-buildx-action@v1

      - name: Login to DockerHub
        uses: docker/login-action@v1
        with:
          username: ${{ secrets.DOCKER_HUB_USERNAME }}
          password: ${{ secrets.DOCKER_HUB_TOKEN }}

      - name: Build and push
        uses: docker/build-push-action@v2
        with:
          push: true

 tags: tejask0512/aqi-app:latest
Troubleshooting Common Docker Issues
Container Won’t Start
Check the logs:
docker logs aqi-containerCheck if ports are already in use:
sudo lsof -i :5000Container Starts but Application Isn’t Accessible
Verify network settings:
docker network inspect bridgeMake sure the application is binding to 0.0.0.0, not localhost or 127.0.0.1.
Out of Disk Space
Clean up unused Docker resources:
docker system prune -aPerformance Issues
Monitor resource usage:
docker statsConsider setting appropriate resource limits in docker-compose.yml.
Conclusion
Containerizing applications with Docker transforms the way we develop, deploy, and scale software. Whether you’re working with a simple Flask application or a complex microservices architecture, Docker provides the tools to manage your infrastructure effectively.
By following the practices outlined in this guide, you can build, deploy, and manage containerized applications with confidence. The AQI app example demonstrates how different services can work together seamlessly in a Docker environment, providing a foundation you can build upon for your own projects.
Remember, containerization is not just about wrapping your application in Docker – it’s about embracing an entire ecosystem of tools and practices that make your applications more reliable, scalable, and easier to manage.
Would you like me to explain any particular section of this guide in more detail?