
Computer Vision for Gesture Control: Building a Hand-Controlled Mouse
Introduction
In today’s digital era, the way we interact with computers continues to evolve. Beyond the traditional keyboard and mouse, gesture recognition represents one of the most intuitive forms of human-computer interaction. By leveraging computer vision techniques and machine learning, we can create systems that interpret hand movements and translate them into computer commands.
This blog explores the development of a gesture-controlled mouse system that allows users to control their cursor and perform clicks using only hand movements captured by a webcam. We’ll dive deep into the underlying computer vision technologies, implementation details, and practical considerations for building such a system.
The Science Behind Gesture Recognition
Computer Vision Fundamentals
Computer vision is the field that enables computers to derive meaningful information from digital images or videos. At its core, it involves:
- Image Acquisition: Capturing visual data through cameras or sensors
- Image Processing: Manipulating images to enhance features or reduce noise
- Feature Detection: Identifying points of interest within an image
- Pattern Recognition: Classifying patterns or objects within the visual data
For gesture control systems, we need reliable methods to detect hands, identify their landmarks (key points), and interpret their movements.
Hand Detection and Tracking
Modern hand tracking systems typically follow a two-stage approach:
- Hand Detection: Locating the hand within the frame
- Landmark Detection: Identifying specific points on the hand (fingertips, joints, palm center)
Historically, approaches included:
- Color-based segmentation: Isolating hand regions based on skin color
- Background subtraction: Identifying moving objects against a static background
- Feature-based methods: Using handcrafted features like Haar cascades or HOG
Today’s state-of-the-art systems leverage deep learning, specifically convolutional neural networks (CNNs), for both detection and landmark identification.
MediaPipe Hands
Google’s MediaPipe Hands is currently one of the most accessible and accurate hand tracking solutions available. It provides:
- Real-time hand detection
- 21 3D landmarks per hand
- Support for multiple hands
- Cross-platform compatibility
MediaPipe uses a pipeline approach:
- A palm detector that locates hand regions
- A hand landmark model that identifies 21 key points
- A gesture recognition system built on these landmarks
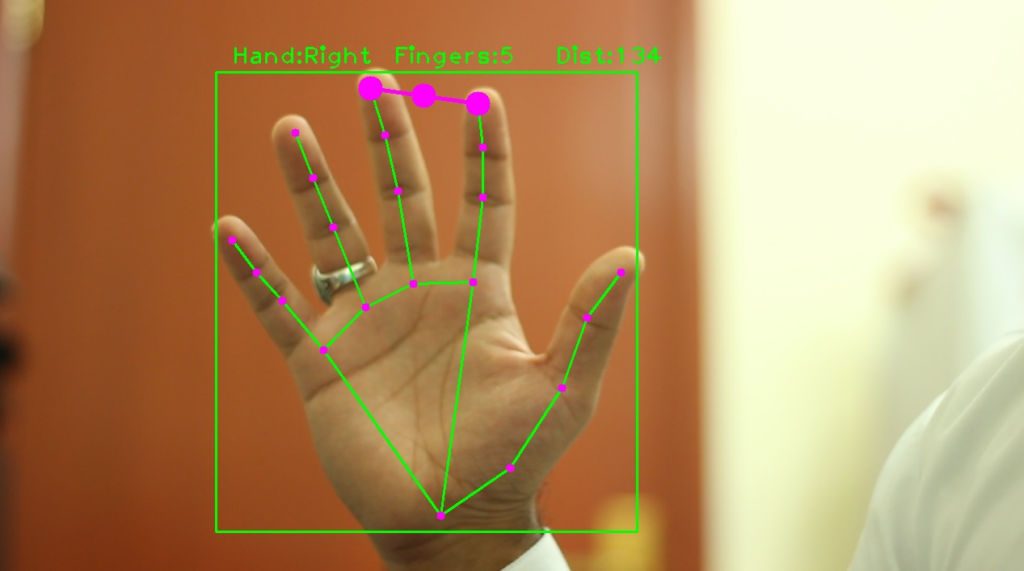
Each landmark corresponds to a specific anatomical feature of the hand:
- Wrist point
- Thumb (4 points)
- Index finger (4 points)
- Middle finger (4 points)
- Ring finger (4 points)
- Pinky finger (4 points)
Sample Code
import cvzone
import cv2

cap = cv2.VideoCapture(0)
cap.set(3, 1280)
cap.set(4, 720)
detector = cvzone.HandDetector(detectionCon=0.5, maxHands=1)

while True:
    # Get image frame
    success, img = cap.read()

    # Find the hand and its landmarks
    img = detector.findHands(img)
    lmList, bbox = detector.findPosition(img)

    # Display
    cv2.imshow("Image", img)
    cv2.waitKey(1)
Building a Gesture-Controlled Mouse
System Architecture
Our gesture mouse system consists of several interconnected components:
- Input Processing: Captures and processes webcam input
- Hand Detection: Identifies hands in the frame
- Landmark Extraction: Locates the 21 key points on each hand
- Gesture Recognition: Interprets specific hand configurations as commands
- Command Execution: Translates gestures into mouse actions
Required Technologies and Libraries
To implement this system, we’ll use:
- OpenCV: For webcam capture and image processing
- MediaPipe: For hand detection and landmark tracking
- PyAutoGUI: For programmatically controlling the mouse
- NumPy: For efficient numerical operations
Implementation Details
Let’s explore the core functionality of our gesture-controlled mouse system:
1. Setting Up the Environment
First, we initialize the necessary libraries and configure MediaPipe for hand tracking:
import cv2
import mediapipe as mp
import pyautogui
import numpy as np
import time

# Initialize MediaPipe Hand solution
mp_hands = mp.solutions.hands
hands = mp_hands.Hands(
    static_image_mode=False,
    max_num_hands=1,
    min_detection_confidence=0.7,
    min_tracking_confidence=0.5
)
mp_drawing = mp.solutions.drawing_utils

# Get screen dimensions for mapping hand position to screen coordinates
screen_width, screen_height = pyautogui.size()
The MediaPipe configuration includes several important parameters:
static_image_mode=False: Optimizes for video sequence trackingmax_num_hands=1: Limits detection to one hand for simplicitymin_detection_confidence=0.7: Sets the threshold for hand detectionmin_tracking_confidence=0.5: Sets the threshold for tracking continuation
2. Capturing and Processing Video
Next, we set up the webcam capture and create the main processing loop:
# Get webcam
cap = cv2.VideoCapture(0)

while cap.isOpened():
    success, image = cap.read()
    if not success:
        print("Failed to capture image from webcam.")
        continue

    # Flip the image horizontally for a more intuitive mirror view
    image = cv2.flip(image, 1)

    # Convert BGR image to RGB for MediaPipe
    rgb_image = cv2.cvtColor(image, cv2.COLOR_BGR2RGB)

    # Process the image and detect hands
    results = hands.process(rgb_image)
The horizontal flip creates a mirror-like experience, making the interaction more intuitive for users.
3. Hand Landmark Detection
Once we have processed the image, we extract and visualize the hand landmarks:
# Draw hand landmarks if detected
if results.multi_hand_landmarks:
    for hand_landmarks in results.multi_hand_landmarks:
        mp_drawing.draw_landmarks(
            image, hand_landmarks, mp_hands.HAND_CONNECTIONS)

        # Get the landmarks as a list
        landmarks = hand_landmarks.landmark

        # Process landmarks for mouse control...
Each detected hand provides 21 landmarks with normalized coordinates:
- x, y: Normalized to [0.0, 1.0] within the image
- z: Represents depth with the wrist as origin (negative values are toward the camera)
4. Implementing Mouse Movement
To control mouse movement, we map hand position to screen coordinates:
# Smoothing factors
smoothing = 5
prev_x, prev_y = 0, 0

# Inside the main loop:
# Using wrist position for mouse control
wrist = landmarks[mp_hands.HandLandmark.WRIST]
x = int(wrist.x * screen_width)
y = int(wrist.y * screen_height)

# Apply smoothing for more stable cursor movement
prev_x = prev_x + (x - prev_x) / smoothing
prev_y = prev_y + (y - prev_y) / smoothing

# Move the mouse
pyautogui.moveTo(prev_x, prev_y)
The smoothing factor reduces jitter by creating a weighted average between the current and previous positions, resulting in more fluid cursor movement.
5. Gesture Recognition for Mouse Clicks
For click actions, we detect finger tap gestures:
def detect_finger_tap(landmarks, finger_tip_idx, finger_pip_idx):
    """Detect if a finger is tapped (tip close to palm)"""
    tip = landmarks[finger_tip_idx]
    pip = landmarks[finger_pip_idx]

    # Calculate vertical distance between tip and pip
    distance = abs(tip.y - pip.y)

    # If tip is below pip and close enough, it's a tap
    return tip.y > pip.y and distance < tap_threshold

# In the main loop:
# Detect index finger tap for left click
if detect_finger_tap(landmarks, mp_hands.HandLandmark.INDEX_FINGER_TIP, mp_hands.HandLandmark.INDEX_FINGER_PIP):
    current_time = time.time()
    if current_time - last_index_tap_time > tap_cooldown:
        print("Left click")
        pyautogui.click()
        last_index_tap_time = current_time

# Detect middle finger tap for right click
if detect_finger_tap(landmarks, mp_hands.HandLandmark.MIDDLE_FINGER_TIP, mp_hands.HandLandmark.MIDDLE_FINGER_PIP):
    current_time = time.time()
    if current_time - last_middle_tap_time > tap_cooldown:
        print("Right click")
        pyautogui.rightClick()
        last_middle_tap_time = current_time
The tap detection works by:
- Measuring the vertical distance between a fingertip and its corresponding PIP joint
- Identifying a tap when the fingertip moves below the joint and within a certain distance threshold
- Implementing a cooldown period to prevent accidental multiple clicks
Implementing Scrolling Functionality
Scrolling is an essential feature for navigating documents and webpages. Let’s implement smooth scrolling control using hand gestures.
1. Pinch-to-Scroll Implementation
One of the most intuitive ways to implement scrolling is through a pinch gesture between the thumb and ring finger, followed by vertical movement:
# Global variables for tracking scroll state
scroll_active = False
scroll_start_y = 0
last_scroll_time = 0
scroll_cooldown = 0.05  # Seconds between scroll actions
scroll_sensitivity = 1.0  # Adjustable scroll sensitivity

def detect_scroll_gesture(landmarks):
    """Detect thumb and ring finger pinch for scrolling"""
    thumb_tip = landmarks[mp_hands.HandLandmark.THUMB_TIP]
    ring_tip = landmarks[mp_hands.HandLandmark.RING_FINGER_TIP]

    # Calculate distance between thumb and ring finger
    distance = np.sqrt((thumb_tip.x - ring_tip.x)**2 + (thumb_tip.y - ring_tip.y)**2)

    # If thumb and ring finger are close enough, it's a pinch
    return distance < 0.07  # Threshold value may need adjustment

# In the main loop:
if results.multi_hand_landmarks:
    landmarks = results.multi_hand_landmarks[0].landmark

    # Check for scroll gesture
    is_scroll_gesture = detect_scroll_gesture(landmarks)

    # Get middle point between thumb and ring finger for tracking
    if is_scroll_gesture:
        thumb_tip = landmarks[mp_hands.HandLandmark.THUMB_TIP]
        ring_tip = landmarks[mp_hands.HandLandmark.RING_FINGER_TIP]
        current_y = (thumb_tip.y + ring_tip.y) / 2

        # Initialize scroll if just started pinching
        if not scroll_active:
            scroll_active = True
            scroll_start_y = current_y
        else:
            # Calculate scroll distance
            current_time = time.time()
            if current_time - last_scroll_time > scroll_cooldown:
                # Convert movement to scroll amount
                scroll_amount = int((current_y - scroll_start_y) * 20 * scroll_sensitivity)

                if abs(scroll_amount) > 0:
                    # Scroll up or down
                    pyautogui.scroll(-scroll_amount)  # Negative because screen coordinates are inverted
                    scroll_start_y = current_y  # Reset start position
                    last_scroll_time = current_time
    else:
        scroll_active = False
This implementation:
- Detects a pinch between the thumb and ring finger
- Tracks the vertical movement of the pinch
- Converts the movement to scrolling actions
- Uses a cooldown mechanism to prevent too many scroll events
- Applies sensitivity settings to adjust scroll speed
2. Alternative: Two-Finger Scroll Gesture
For users who might find the pinch gesture challenging, we can implement an alternative two-finger scroll method:
def detect_two_finger_scroll(landmarks):
    """Detect index and middle finger extended for scrolling"""
    index_tip = landmarks[mp_hands.HandLandmark.INDEX_FINGER_TIP]
    index_pip = landmarks[mp_hands.HandLandmark.INDEX_FINGER_PIP]
    middle_tip = landmarks[mp_hands.HandLandmark.MIDDLE_FINGER_TIP]
    middle_pip = landmarks[mp_hands.HandLandmark.MIDDLE_FINGER_PIP]

    # Check if both fingers are extended (tips above pips)
    index_extended = index_tip.y < index_pip.y
    middle_extended = middle_tip.y < middle_pip.y

    # Check if other fingers are curled
    ring_tip = landmarks[mp_hands.HandLandmark.RING_FINGER_TIP]
    ring_pip = landmarks[mp_hands.HandLandmark.RING_FINGER_PIP]
    pinky_tip = landmarks[mp_hands.HandLandmark.PINKY_TIP]
    pinky_pip = landmarks[mp_hands.HandLandmark.PINKY_PIP]

    ring_curled = ring_tip.y > ring_pip.y
    pinky_curled = pinky_tip.y > pinky_pip.y

    # Return true if index and middle extended, others curled
    return index_extended and middle_extended and ring_curled and pinky_curled
This can then be integrated into the main loop similarly to the pinch gesture method.
3. Visual Feedback for Scrolling
Providing visual feedback helps users understand when the system recognizes their scroll gesture:
# Inside the main loop, when scroll gesture is detected:
if is_scroll_gesture:
    # Draw a visual indicator for active scrolling
    cv2.circle(image, (50, 50), 20, (0, 255, 0), -1)  # Green circle when scrolling
    cv2.putText(image, f"Scrolling {'UP' if scroll_amount < 0 else 'DOWN'}",
                (75, 50), cv2.FONT_HERSHEY_SIMPLEX, 0.7, (0, 255, 0), 2)
Adjustable Mouse Sensitivity
Different users have different preferences for cursor speed and precision. Let’s implement adjustable sensitivity controls:
1. Adding Sensitivity Settings
First, we’ll define sensitivity parameters that can be adjusted:
# Mouse movement sensitivity settings
mouse_sensitivity = 1.0  # Default value
sensitivity_min = 0.2    # Minimum allowed sensitivity
sensitivity_max = 3.0    # Maximum allowed sensitivity
sensitivity_step = 0.1   # Increment/decrement step
2. Applying Sensitivity to Mouse Movement
We need to modify our mouse movement logic to incorporate the sensitivity setting:
# Inside the main loop, when calculating cursor position:
wrist = landmarks[mp_hands.HandLandmark.WRIST]

# Get raw coordinates
raw_x = wrist.x * screen_width
raw_y = wrist.y * screen_height

# Calculate center of screen
center_x = screen_width / 2
center_y = screen_height / 2

# Apply sensitivity to the distance from center
offset_x = (raw_x - center_x) * mouse_sensitivity
offset_y = (raw_y - center_y) * mouse_sensitivity

# Calculate final position
x = int(center_x + offset_x)
y = int(center_y + offset_y)

# Apply smoothing for stable cursor movement
prev_x = prev_x + (x - prev_x) / smoothing
prev_y = prev_y + (y - prev_y) / smoothing

# Move the mouse
pyautogui.moveTo(prev_x, prev_y)
This approach:
- Calculates the cursor position relative to the center of the screen
- Applies the sensitivity factor to the offset from center
- Ensures that low sensitivity gives fine control, while high sensitivity allows rapid movement across the screen
3. Gesture-Based Sensitivity Adjustment
Now we’ll implement gestures to adjust sensitivity on-the-fly:
# Global variables for tracking the last sensitivity adjustment
last_sensitivity_change_time = 0
sensitivity_change_cooldown = 1.0  # Seconds between adjustments

def detect_increase_sensitivity_gesture(landmarks):
    """Detect gesture for increasing sensitivity (pinky and thumb pinch)"""
    thumb_tip = landmarks[mp_hands.HandLandmark.THUMB_TIP]
    pinky_tip = landmarks[mp_hands.HandLandmark.PINKY_TIP]

    distance = np.sqrt((thumb_tip.x - pinky_tip.x)**2 + (thumb_tip.y - pinky_tip.y)**2)
    return distance < 0.07

def detect_decrease_sensitivity_gesture(landmarks):
    """Detect gesture for decreasing sensitivity (thumb touching wrist)"""
    thumb_tip = landmarks[mp_hands.HandLandmark.THUMB_TIP]
    wrist = landmarks[mp_hands.HandLandmark.WRIST]

    distance = np.sqrt((thumb_tip.x - wrist.x)**2 + (thumb_tip.y - wrist.y)**2)
    return distance < 0.12

# In the main loop:
# Check for sensitivity adjustment gestures
current_time = time.time()
if current_time - last_sensitivity_change_time > sensitivity_change_cooldown:
    if detect_increase_sensitivity_gesture(landmarks):
        mouse_sensitivity = min(mouse_sensitivity + sensitivity_step, sensitivity_max)
        print(f"Sensitivity increased to: {mouse_sensitivity:.1f}")
        last_sensitivity_change_time = current_time

    elif detect_decrease_sensitivity_gesture(landmarks):
        mouse_sensitivity = max(mouse_sensitivity - sensitivity_step, sensitivity_min)
        print(f"Sensitivity decreased to: {mouse_sensitivity:.1f}")
        last_sensitivity_change_time = current_time
4. On-Screen Sensitivity Display
To help users understand the current sensitivity level, we can display it on the screen:
# Inside the main loop, after handling sensitivity adjustments:
# Display current sensitivity on screen
cv2.putText(image, f"Sensitivity: {mouse_sensitivity:.1f}",
            (10, image.shape[0] - 20), cv2.FONT_HERSHEY_SIMPLEX,
            0.7, (0, 255, 0), 2)
5. UI Controls for Sensitivity Adjustment
For a more user-friendly experience, we can add GUI controls using OpenCV:
# Create a sensitivity slider using OpenCV
def create_control_window():
    cv2.namedWindow('Mouse Controls')
    cv2.createTrackbar('Sensitivity', 'Mouse Controls',
                       int(mouse_sensitivity * 10),
                       int(sensitivity_max * 10),
                       on_sensitivity_change)
    cv2.createTrackbar('Scroll Speed', 'Mouse Controls',
                       int(scroll_sensitivity * 10),
                       int(sensitivity_max * 10),
                       on_scroll_sensitivity_change)

def on_sensitivity_change(value):
    global mouse_sensitivity
    mouse_sensitivity = value / 10.0

def on_scroll_sensitivity_change(value):
    global scroll_sensitivity
    scroll_sensitivity = value / 10.0

# Call at the beginning of your program
create_control_window()
6. Configuration File for Persistent Settings
To remember user preferences between sessions, we can save settings to a configuration file:
import json
import os

config_file = "gesture_mouse_config.json"

def save_settings():
    """Save current settings to a JSON file"""
    settings = {
        "mouse_sensitivity": mouse_sensitivity,
        "scroll_sensitivity": scroll_sensitivity,
        "smoothing": smoothing
    }

    with open(config_file, 'w') as f:
        json.dump(settings, f)

    print("Settings saved!")

def load_settings():
    """Load settings from a JSON file if it exists"""
    global mouse_sensitivity, scroll_sensitivity, smoothing

    if os.path.exists(config_file):
        try:
            with open(config_file, 'r') as f:
                settings = json.load(f)

            mouse_sensitivity = settings.get("mouse_sensitivity", mouse_sensitivity)
            scroll_sensitivity = settings.get("scroll_sensitivity", scroll_sensitivity)
            smoothing = settings.get("smoothing", smoothing)

            print("Settings loaded!")
        except:
            print("Error loading settings. Using defaults.")

# Load settings at startup
load_settings()

# Add keyboard event to save settings:
# (inside the main loop)
key = cv2.waitKey(1) & 0xFF
if key == ord('s'):
    save_settings()
Technical Challenges and Solutions
Challenge 1: Hand Detection Stability
Problem: Hand detection can be inconsistent under varying lighting conditions or when the hand moves quickly.
Solution: Multiple approaches can improve stability:
- Adjust MediaPipe confidence thresholds based on your environment
- Implement background removal techniques to isolate the hand
- Use temporal filtering to reject spurious detections
Challenge 2: Gesture Recognition Accuracy
Problem: Distinguishing intentional gestures from natural hand movements.
Solution:
- Define clear gesture thresholds
- Implement gesture “holding” requirements (e.g., maintain a gesture for 300ms)
- Add visual feedback to help users understand when gestures are recognized
Challenge 3: Cursor Stability
Problem: Direct mapping of hand position to cursor coordinates can result in jittery movement.
Solution:
- Implement motion smoothing algorithms (like our weighted average approach)
- Use Kalman filtering for more sophisticated motion prediction
- Create a “deadzone” where small hand movements don’t affect the cursor
Challenge 4: Fatigue and Ergonomics
Problem: Holding the hand in mid-air causes user fatigue over time.
Solution:
- Implement a “clutch” mechanism that enables/disables control
- Design gestures that allow for natural hand positions
- Consider relative positioning rather than absolute positioning
Challenge 5: Scroll Precision
Problem: Scrolling can be too sensitive or jerky with direct hand movement mapping.
Solution:
- Implement non-linear scroll response curves
- Add “scroll momentum” for smoother continuous scrolling
- Provide visual feedback about scroll speed and direction
# Non-linear scroll response curve
def apply_scroll_curve(movement):
    """Apply a non-linear curve to make small movements more precise"""
    # Square the movement but keep the sign
    sign = 1 if movement >= 0 else -1
    magnitude = abs(movement)

    # Apply curve: square for values > 0.1, linear for smaller values
    if magnitude > 0.1:
        result = sign * ((magnitude - 0.1) ** 2) * 2 + (sign * 0.1)
    else:
        result = sign * magnitude

    return result
Advanced Features and Improvements
Enhancing Mouse Movement
For more precise control, we can improve the mapping between hand position and cursor movement:
# Define a region of interest in the camera's field of view
roi_left = 0.2
roi_right = 0.8
roi_top = 0.2
roi_bottom = 0.8

# Map the hand position within this region to screen coordinates
def map_to_screen(x, y):
    screen_x = screen_width * (x - roi_left) / (roi_right - roi_left)
    screen_y = screen_height * (y - roi_top) / (roi_bottom - roi_top)
    return max(0, min(screen_width, screen_x)), max(0, min(screen_height, screen_y))
This approach creates a smaller “active area” within the camera’s view, allowing for more precise movements.
Implementing Additional Gestures
Beyond basic clicking, we can add more complex interactions:
- Scroll wheel emulation:
def detect_scroll_gesture(landmarks):
    thumb_tip = landmarks[mp_hands.HandLandmark.THUMB_TIP]
    index_tip = landmarks[mp_hands.HandLandmark.INDEX_FINGER_TIP]

    # Calculate pinch distance
    distance = ((thumb_tip.x - index_tip.x)**2 + (thumb_tip.y - index_tip.y)**2)**0.5

    # If pinching, track vertical movement for scrolling
    if distance < pinch_threshold:
        return (index_tip.y - prev_index_y) * scroll_sensitivity
    return 0
- Drag and drop:
# Track index finger extension status
index_extended = landmarks[mp_hands.HandLandmark.INDEX_FINGER_TIP].y < landmarks[mp_hands.HandLandmark.INDEX_FINGER_PIP].y

# If status changes from extended to not extended while moving, start drag
if prev_index_extended and not index_extended:
    pyautogui.mouseDown()
elif not prev_index_extended and index_extended:
    pyautogui.mouseUp()
- Gesture-based shortcuts:
# Detect specific finger configurations
if all_fingers_extended(landmarks):
    # Perform action, like opening task manager
    pyautogui.hotkey('ctrl', 'shift', 'esc')
Calibration System
A calibration system improves accuracy across different users and environments:
def calibrate():
    calibration_points = [(0.1, 0.1), (0.9, 0.1), (0.9, 0.9), (0.1, 0.9)]
    user_points = []

    for point in calibration_points:
        # Prompt user to place hand at this position
        # Record actual hand position
        user_points.append((wrist.x, wrist.y))

    # Create transformation matrix
    transformation = calculate_transformation(calibration_points, user_points)
    return transformation
Performance Optimization
To ensure smooth operation, several optimizations are critical:
1. Frame Rate Management
Processing every frame can be computationally expensive. We can reduce the processing load:
# Process only every n frames
if frame_count % process_every_n_frames == 0:
    # Process hand detection and tracking
else:
    # Use the previous result
2. Resolution Scaling
Lower resolution processing can significantly improve performance:
# Scale down the image for processing
process_scale = 0.5
small_frame = cv2.resize(image, (0, 0), fx=process_scale, fy=process_scale)

# Process the smaller image
results = hands.process(small_frame)

# Scale coordinates back up when using them
x = int(landmark.x / process_scale)
y = int(landmark.y / process_scale)
3. Multi-threading
Separating video capture from processing improves responsiveness:
def capture_thread():
    while running:
        ret, frame = cap.read()
        if ret:
            frame_queue.put(frame)

def process_thread():
    while running:
        if not frame_queue.empty():
            frame = frame_queue.get()
            # Process the frame
Real-World Applications
Gesture control systems have numerous practical applications beyond cursor control:
- Accessibility: Enables computer use for people with mobility impairments
- Medical Environments: Allows for touchless interaction in sterile settings
- Presentations: Facilitates natural interaction with slides and content
- Gaming: Creates immersive control experiences without specialized hardware
- Smart Home Control: Enables intuitive interaction with IoT devices
- Virtual Reality: Provides hand tracking for more realistic VR experiences
Challenges and Future Directions
While powerful, gesture control systems face several ongoing challenges:
Technical Limitations
- Occlusion: Fingers may be hidden from the camera’s view
- Background Complexity: Busy environments can confuse hand detection
- Lighting Sensitivity: Performance varies with lighting conditions
- Camera Limitations: Low frame rates or resolution affect tracking quality
Future Research Directions
- Multi-modal Integration: Combining gestures with voice commands or eye tracking
- Context-aware Gestures: Adapting to different applications automatically
- Personalized Gestures: Learning user-specific gesture patterns
- Transfer Learning: Applying knowledge from one gesture domain to another
- Edge Processing: Moving computations to specialized hardware for better performance
Conclusion
Computer vision-based gesture control represents a significant step forward in human-computer interaction, offering a more natural and intuitive way to control computers. By leveraging libraries like MediaPipe and OpenCV, developers can now create sophisticated gesture recognition systems with relatively modest technical requirements.
Our gesture-controlled mouse system demonstrates the core principles of this technology, with additional features like scrolling and adjustable sensitivity making it truly practical for everyday use. The accessibility and customizability of such systems highlight the exciting possibilities at the intersection of computer vision, machine learning, and human-computer interaction.
Whether for accessibility, specialized environments, or simply for the joy of a more natural interaction, gesture control systems are poised to become an increasingly common part of our digital interfaces.
Code Repository
The complete implementation of the gesture-controlled mouse system described in this blog is available on GitHub at {https://github.com/tejask0512/Hand_Gesture_Mouse_Computer_Vision} . The code is extensively commented to help you understand each component and customize it for your specific needs.
References and Further Reading
- MediaPipe Hands: https://google.github.io/mediapipe/solutions/hands.html
- OpenCV Documentation: https://docs.opencv.org/
- PyAutoGUI Documentation: https://pyautogui.readthedocs.io/
- “Hand Gesture Recognition: A Literature Review” – S. S. Rautaray and A. Agrawal
- “Vision Based Hand Gesture Recognition for Human Computer Interaction” – Pavlovic et al.